It's been a while since Pushed is around. One of the things we enjoy the most is to see how our users use the platform for very different purposes. Within that usage, we become aware of different visions and needs, so today we'd like to talk about the subscription process and some changes we implemented to adapt it to your needs.
As you may know, in order to receive push notifications you must be subscribed to a Pushed app or channel. The subscription process is quite easy, click on the subscription link or accept a subscription invitation and you're ready to go.
But privacy is always important, so that's why you can choose whether you'd prefer users to freely subscribe to your app or channel or restrict the subscription to certain users. In Pushed, we refer to the latest kind of app as "private app". Basically, what private means is that they don't appear on the public search within Pushed clients (iOs, Android and website). If the app is private then a user can't find you on the public search. Then, you might be asking yourself, how would they subscribe to my apps or channels? Easy: By using the public subscription link. The public subscription link is the tool to use when you want someone to subscribe to your channel directly.
But there was a downsize to this method, as whether the app or channel was public or private, the public subscription link always worked. We've fixed that.
Now, you have the possibility to enable or disable the public subscription link. This means that your application will be fully private by default, no one can subscribe unless you enable the public subscription link. And even when enabling the public subscription link your app will still remain private if that's how you'd want it to be.
This feature gives you the ability to fully control the subscription process, allowing you to adopt more flexibility and a deeper level of customisation.
We're working on some cool new features to expand the possibilities so all of our users can improve the integration with Pushed and their systems.
Pushed offers a very powerful subscription management system so you can handle subscriptions in your apps and channels. We call it Members-Only feature, and it is meant to easily manage subscriptions in Pushed.
Managing subscribers is a feature available in Pro and Enterprise plan.
First of all, to enable Members-Only feature you must set your app or channel as Private (in settings), and then toggle the Members-Only switch:
Once you have enabled Members-Only feature you will gain access to the Manage Subscribers features:
In this screen you can perform all the operations related to managing subscribers: invite a user, remove a user or check an invitation.
Inviting Users
Inviting subscribers is really easy. We will cover two ways of doing it (using the web application and programatically using our API). Once the user is invited he will receive an email message and a Pushed notification. Once the users accepts the invitation, the user will be shown in the Subscribers tab.
To invite a user using the web application all you have to do is to Pending Invitations and click in Invite New User, the following modal window will be shown:
In the modal window you can specify one, or multiple emails (separated by commas).
If you want to invite user programmatically using our API, here's the documentation of the request you can use. Additionally, you can find a sample of the API request here.
Pushed can be used to send messages to a large amount of users, that is pretty straightforward to understand. If you create an app or channel in Pushed and people subscribes to it, once you send a message everyone will receive that message. But, ¿what if you want to specifically target a user?
Depending on which target you want to reach for your notifications, you will use different type of targets:
app: Send a notification to all subscribers of an app.
channel: Send a notification to all subscribers of a channel.
user: Send a notification to an specific user specifying user alias (OAuth required).
pushed_id: Send a notification to an specific user specifying Pushed ID.
email: Send a notification to an specific user using its email (registered in Pushed).
Today we will cover the specifics of targeting individual users using our API. Remember that in all scenarios, the user must be subscribed to your app or channel in order to be able to send him notifications.
Using Email
Email is the easiest way to target an specific user. To do so you only need the email of the user (the email must match the user's Pushed account). This basically means that the email the user used to sign up with Pushed must match the one you specify. In order to use email targeting, the following points must be comply:
The integration between your system (in this case the shop and Pushed) it's done with OAuth authentication. This allows the integration between Pushed and any other service. Once the user has been authenticated in Pushed, you will receive an access_token that needs to be used in the API call.
Add target_type = user and access_token = the_access_token to the push API request.
The user must be subscribed to your App or Channel (because you requested authorisation, you can programmatically subscribe the user to your app or channel).
Using PushedID
This target can be used in a wide variety of situations.
The most common are third party integrations and physical interaction integrations.
Third Party Integrations
PushedID provides a very direct and easy way to target users in Pushed. An example will be handy in this case. Bugsnag, an error monitoring platform, allows you to send a push notification to Pushed every time there's a new issue in your project. The configuration is very easy, to do so you only need to add your PushedID in Bugsnag's site and enable the integration:
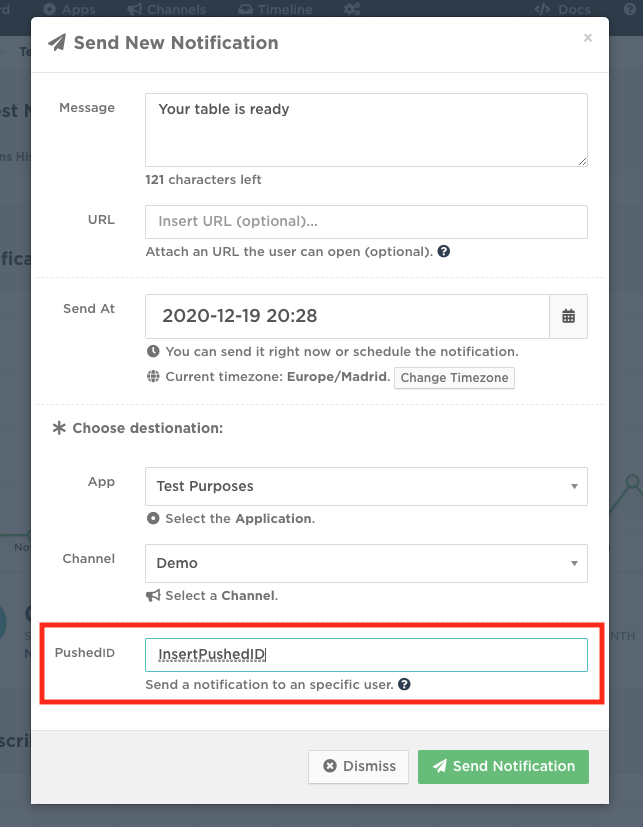
Let's make an example. Imagine you run a restaurant and a new customer comes in. Unfortunately the restaurant is at its full capacity, but a table is finishing soon. Instead of making your customer wait for an unpredictable amount of time, you use Pushed to let him know when the table is ready. Because the user it's at the same physical place, you can use PushedID to gain permissions for sending notifications to the user (the user will be able to unsubscribe at any time). This would be the process:
You show the customer the QR subscription code from your App or Channel and the customer subscribes to it using the Scan QR option in Pushed.
Once the customer is registered, we need his goes to Account and opens the PushedID option. This will display a QR code you can scan to copy the PushedID of the customer.
You use that PushedID to send him a notification once the table is ready (available in API or web).
Since yesterday, followed by a major API upgrade in Pushed, Pushed Android app has been experiencing issues that prevents users using the app normally. Our development team is working to fix the issue as soon as possible. We will be updating the status in getpushedapp and this post.
08:25 (European CET):Pushed Android app fails to load.
11:36 (European CET): We have identified and fixed the issue. Android app should be working as usual.
This week we feature a simple yet handy real world integration that will be very useful for people using Laravel’s Envoyer service. For those who are unfamiliar with it, Envoyer is a service that allows you to deploy PHP and Laravel applications without any downtime.
We’re quite big fans of Laravel, in fact, Pushed website is built with Laravel, so this is an integration we use ourselves every day.
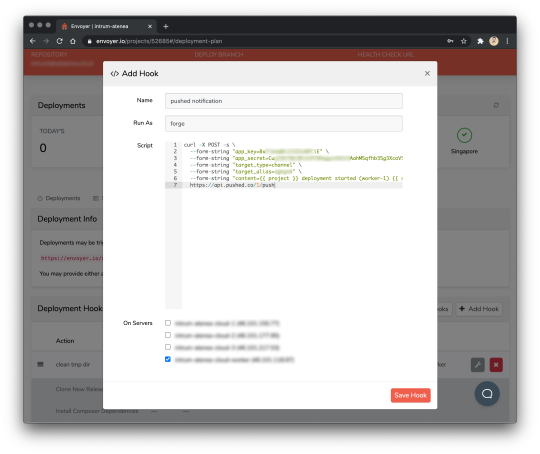
The goal of this integration is simple: to make Envoyer notify us each time a deployment starts and finishes. To do so we will take advantage of Envoyer’s Deployment Hooks feature, that allow us to trigger action on every stage of the deployment process. We will add push notifications in two actions:
At the beginning of the deployment
Once the deployment has finished
(but feel free to add as many as you like).
To enable push notifications in Pushed for every Envoyer deployment just follow this simple steps:
Open “Deployment Hooks” and click on “+ Add Hook”, a modal window will appear:
Then all you have to do is to insert the bash script:
In a continuous effort to make Pushed easier to use for our customers, we have enabled a new target_type that will enhance user targeting.
If you need to send a notification to a certain user, you now have three options: using email, PushedID or OAuth token.
It is pretty simple to explain :) If you know the email of the user that is subscribed to your channel, you can directly send notifications to them using the following request:
It’s been a while since our latest post here in our blog. We mainly used it to announce technical announcements and few more things. This is going to change dramatically, and today we want to announce a new series called “Pushed in the real world” where we will showcase real applications of Pushed of people not related to use that uses Pushed to make incredible things.
This week we would like to feature T3ch Flicks channels both educational and funny video on “how they put a super spooky twist on a mundane household classic: the security camera”.
In the video, they will show you how to make a night vision owl which uses image processing to track people. Once they track down someone, the owl will send you a notification through Pushed to let you know someone is there!
As they say: “If you want to keep an eye out for approaching zombies on Halloween or just check your garden the rest of the year-round, this is the one for you. Security doesn’t have to be boring to be effective!”
Here you have full instructions on how to do it yourself:
Hope you like this project, this is exactly why we built Pushed, so users can have a very simple way of getting notifications without the hassle of developing an app!
See you in the next edition of Pushed In The Real World!
As you may have noticed, this is the second major upgrade and hopefully will be the latest time we experience downtime while updating our systems. With these upgrades we will be able to provide consisten performance and zero downtime on our service even though some parts of our infrastructure goes down.
During the above window the development team will be performing important infrastructure upgrades. This is upgrade is required to ensure optimal performance of the Pushed infrastructure and enable new features and more notifications throughput in the future.
Expected Impact: The impact of this upgrade will affect all Pushed services, therefore, API, Site and mobile applications will be offline during the upgrade.
Approximately 30 minutes prior to the maintenance we will post an update on twitter.com/getpushedapp and periodic updates will follow as work progresses.
Do not hesitate to contact support if you have any additional questions or concerns. You may do so by opening a ticket, or by replying to this email.
Cookies on Pushed.coPushed uses cookies to help give you the best possible user experience. By continuing using Pushed you give consent for cookies to be used.To find out more about cookies and how to manage them click here.
 pushed